

How to Add Custom Fonts in Your Shopify Theme Without Any App
Most Shopify themes, by default, come with a variety of Google Fonts built-in. Depending on your theme, you can easily find and change them
on the Customise page of your theme and play around with a few different styles and combinations.
However, one thing that is not quite straightforward in Shopify is: how exactly can you add your own custom fonts? Say you have downloaded
a new font and you have now a few .ttf, .woff, .woff2, and/or some other file extensions. How would you go about adding them to your
theme and, equally important, making them the default instead of whichever font was previously being used?
In this tutorial, I'll be teaching you how to achieve that. Also, don't worry – no coding knowledge is required, but for more thorough
customizations of how to style each specific HTML element with your font of choice, you may need some familiarity with HTML/CSS.
Steps for Adding Custom Fonts in Your Shopify Theme Without Any App
- Go to your Shopify dashboard.
- Navigate to Online Store > Themes.
-
In the “Current theme” section, click on Actions > Duplicate.


Step 2: Adding the Font File to Your Shopify Store
The first thing that we have to do is to add the fonts to the Shopify store. From there, we can reference it via code and use it in our theme.
- From your Shopify admin, navigate to Content > Files > Upload Files.

- Click on upload files at the top right and upload all of your font files. Web Font files are the ones that have the following extensions: .ttf, .woff,.woff2, .eot, .svg or .otf
Therefore, make sure you upload all font files that came with the .zip, or at least the ones you want to use.
In this case, I have one single font file with the .otf format, so I'll be uploading only this one. 
-
Once you have uploaded all of your font files, it's time to add some code to read them.
- From your Shopify admin, navigate to Content > Files > Upload Files.
- Click on upload files at the top right and upload all of your font files. Web Font files are the ones that have the following extensions: .ttf, .woff,.woff2, .eot, .svg or .otfTherefore, make sure you upload all font files that came with the .zip, or at least the ones you want to use. In this case, I have one single font file with the .otf format, so I'll be uploading only this one.
- Once you have uploaded all of your font files, it's time to add some code to read them.


Step 3: Adding the Custom Font Section Support
- In the Shopify admin, go to Online Store > Themes.
-
Click Actions > Edit code for your active theme.

-
Under sections, click on “Add a new section” and create a section named: custom-fonts

- Paste the following code and save:
- Now, open the file named theme.liquid. Make sure it reads exactly “theme.liquid”.
-
Search for:
<body -
Paste the following code right below the line you found:
{% section 'custom-fonts' %}


  {% if section.settings.enable %}
  <style data-custom-fonts>
    {% assign items = section.blocks | reverse  %}


      {% for block in items %}

      {% assign name = block.settings.name %}
      {% assign url = block.settings.custom_font_url  %}
      {% assign custom_font_weight = block.settings.custom_font_weight %}
      {% assign custom_font_style = block.settings.custom_font_style %}
      {% assign apply_h1 = block.settings.apply_h1 %}
      {% assign apply_h2 = block.settings.apply_h2 %}
      {% assign apply_h3 = block.settings.apply_h3 %}
      {% assign apply_h4 = block.settings.apply_h4 %}
      {% assign apply_h5 = block.settings.apply_h5 %}
      {% assign apply_h6 = block.settings.apply_h6 %}
      {% assign apply_span = block.settings.apply_span %}
      {% assign apply_p = block.settings.apply_p %}
      {% assign apply_custom = block.settings.apply_custom %}

      {% if url != blank and url != "" %}

        {% capture _font_type %}
        {% if url contains ".otf" %}
        opentype
        {% elsif url contains ".ttf" %}
        truetype
        {% elsif url contains ".svg" %}
        svg
        {% elsif url contains ".woff2" %}
        woff2
        {% else %}
        woff
        {% endif %}
        {% endcapture %}

        {% assign font_type = _font_type | strip %}
          @font-face {
            font-family: '{{ name }}';
            src: url({{ url }}) format('{{ font_type }}');

              {% if custom_font_style != 'none' %}
            font-style: {{ custom_font_style }};
              {% endif %}
            {% if custom_font_weight != 'none' %}
            font-weight: {{ custom_font_weight }};
              {% endif %}
          }


          {% if apply_h1 %}
            h1{
              font-family: '{{name}}' !important;
            }
          {% endif %}

          {% if apply_h2 %}
            h2{
              font-family: '{{name}}' !important;

            }
          {% endif %}

          {% if apply_h3 %}
            h3{
              font-family: '{{name}}' !important;
            }
          {% endif %}

          {% if apply_h4 %}
            h4{
              font-family: '{{name}}' !important;
            }
          {% endif %}

          {% if apply_h5 %}
            h5{
              font-family: '{{name}}' !important;
            }
          {% endif %}

          {% if apply_h6 %}
            h6{
              font-family: '{{name}}' !important;
            }
          {% endif %}

          {% if apply_p %}
            p{
              font-family: '{{name}}' !important;
            }
          {% endif %}

          {% if apply_span %}
            span{
              font-family: '{{name}}' !important;
            }
          {% endif %}

          {% if apply_custom != "" and apply_custom != blank %}
            {{ apply_custom }}{
              font-family: '{{name}}' !important;
            }
          {% endif %}


      {% endif %}
      {% endfor %}
  </style>
{% endif %}

{% schema %}
{
  "name": "Custom Font",
  "settings": [
    {
      "type": "header",
      "content": "Made by [optixpert.blogspot.com](https://optixpert.blogspot.com/)"
    },
    {
      "type": "paragraph",
      "content": "Replace apps with copy/paste code snippets like this one & save money. [Click here for more tutorials.](https://optixpert.blogspot.com/)"
    },
    {
      "type": "checkbox",
      "id": "enable",
      "label": "Enable",
      "default": true
    }
  ],
  "blocks": [
    {
      "type": "image",
      "name": "Font",
      "settings": [
        {
          "type": "header",
          "content": "Made by [optiXpert.blogspot.com](https://optiXpert.blogspot.com/)"
        },
        {
          "type": "text",
          "id": "name",
          "label": "Custom font name",
          "info": "Use only lower or upper characters from A-Z. No numbers, no special characters, no spaces.",
          "default": "Enter Custom Font Name"
        },
        {
          "type": "select",
          "id": "custom_font_weight",
          "label": "Font weight",
          "info": "If you're unsure, use \"none\".",
          "default": "none",
          "options": [
            {
              "value": "none",
              "label": "None"
            },
            {
              "value": "normal",
              "label": "Normal"
            },
            {
              "value": "bold",
              "label": "Bold"
            },
            {
              "value": "100",
              "label": "100"
            },
            {
              "value": "200",
              "label": "200"
            },
            {
              "value": "300",
              "label": "300"
            },
            {
              "value": "400",
              "label": "400"
            },
            {
              "value": "500",
              "label": "500"
            },
            {
              "value": "600",
              "label": "600"
            },
            {
              "value": "700",
              "label": "700"
            },
            {
              "value": "800",
              "label": "800"
            }
          ]
        },
        {
          "type": "select",
          "id": "custom_font_style",
          "label": "Font style",
          "info": "If you're unsure, use \"none\".",
          "default": "none",
          "options": [
            {
              "value": "none",
              "label": "None"
            },
            {
              "value": "normal",
              "label": "Normal"
            },
            {
              "value": "italic",
              "label": "Italic"
            }
          ]
        },
        {
          "type": "text",
          "id": "custom_font_url",
          "label": "Custom font URL",
          "info": "Add all URLs for this font here, one per line. Upload your fonts to the [files panel](/admin/settings/files)."
        },
        {
          "type": "paragraph",
          "content": "Apply the custom font to the following HTML elements:"
        },
        {
          "type": "checkbox",
          "id": "apply_h1",
          "label": "H1",
          "default": true
        },
        {
          "type": "checkbox",
          "id": "apply_h2",
          "label": "H2",
          "default": true
        },
        {
          "type": "checkbox",
          "id": "apply_h3",
          "label": "H3",
          "default": true
        },
        {
          "type": "checkbox",
          "id": "apply_h4",
          "label": "H4",
          "default": true
        },
        {
          "type": "checkbox",
          "id": "apply_h5",
          "label": "H5",
          "default": true
        },
        {
          "type": "checkbox",
          "id": "apply_h6",
          "label": "H6",
          "default": true
        },
        {
          "type": "checkbox",
          "id": "apply_span",
          "label": "<span> tags",
          "info": "Apply this custom font to all HTML span elements.",
          "default": true
        },
        {
          "type": "checkbox",
          "id": "apply_p",
          "label": "<p> tags",
          "info": "Apply this custom font to all HTML paragraph elements.",
          "default": true
        },
        {
          "type": "textarea",
          "id": "apply_custom",
          "label": "CSS Selectors",
          "info": "Apply font to custom CSS selectors. Example: .custom-text,.wrapper > h1",
          "placeholder": ".my-text"
        }
      ]
    }
  ]
}
{% endschema %}

Step 4: Adding the Custom Font Section Support
- On the top left, click on the 3 dots and “customise theme”.

- On the sidebar located on the left side, you will find a new section called “ Custom Font "
Click on the arrow on the left to expand it, and then click on “Add font”.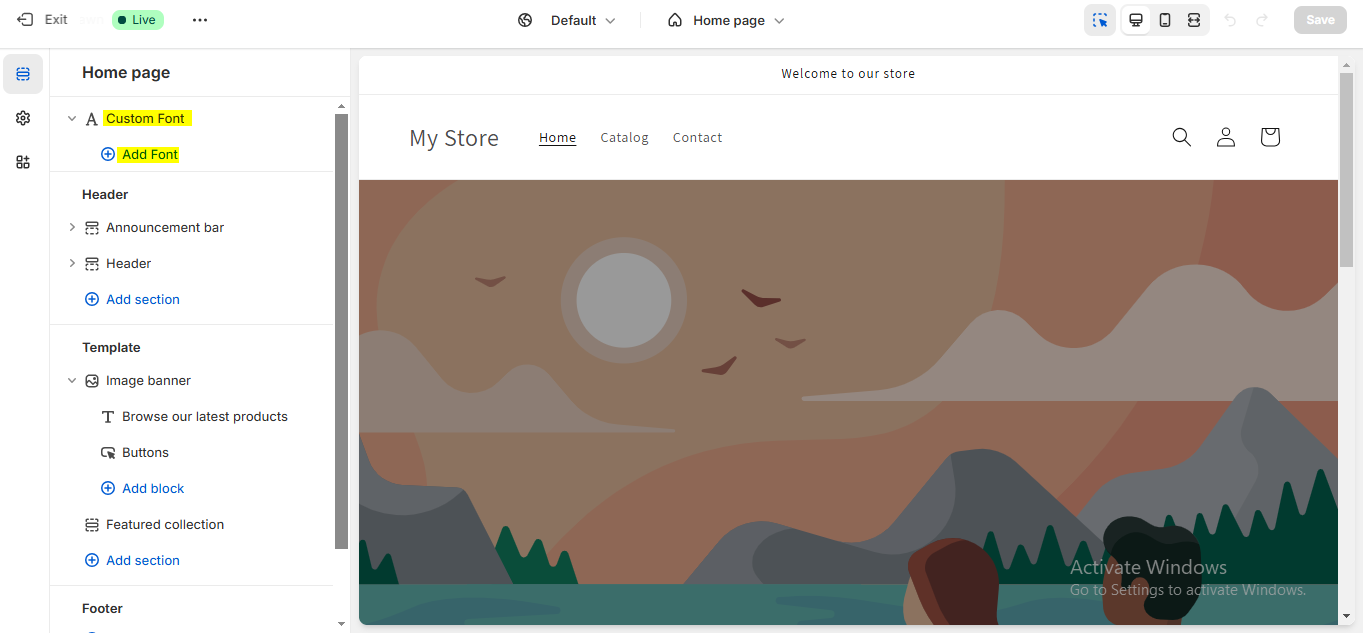
- Under “Custom font name”, make sure you add a descriptive name. It can be anything you wish.
My font's name is “testing”, so I'll be adding that.
Now, under “Custom font URL”, add the URL for the file that was added back in step 2. Simply click on the chain icon to get the font's URL.

- On the screenshot above you can see that the font is immediately loaded right on the Customise page. You can select which HTML elements should display your custom font, as well as add asmany fonts you'd like.Bear in mind that whatever font is first in the list will always overwrite the ones below it.Therefore, if you have added 5 fonts and assigned the “H1” for all 5 of them, the “H1” will use only the very first font in the list.


Extra: Adding the Custom Font For Specific Element
- While in the page containing the element whose font you wish to change, press CTRL + shift + c to open your browser's developer tools in inspection mode. If you're using a Mac, that's CMD + shift + c instead.
- Find the text you want to change the font of and click it. This will highlight the element in the HTML.
- Next, right click the element in the HTML, go to “Copy” and click “Copy selector”. This will copy a CSS selector meant to target this exact element.
- Now that you have your CSS selector, simply copy and paste it at the very bottom at “CSS Selectors”:
- Note that this is a hard coded solution meant to select a single element, meaning that changes to your store's HTML (specially to areas near where the font was changed) are likely to cause it to stop working.
- If that happens, you can re-do this section of the tutorial or use a broader CSS selector. You can do it as many times as you want for any number of elements.


Looking for something specific? Drop me a message.